


Ultimate Guide: Mastering the Art of Headliner Replacement in Your Car UK Style
Replacing the headliner in your car can seem like a daunting task, but with the right tools, knowledge, and a bit of patience, you can achieve professional-looking results. Here’s a comprehensive guide to help you through the process, ensuring your car’s interior looks and feels its best.
Understanding Your Headliner
Before diving into the replacement process, it’s essential to understand what a headliner is and its importance in your car’s interior.
Also to read : Maximizing Fuel Efficiency: Effective Strategies to Enhance Your Car”s Aerodynamics for UK Highway Driving
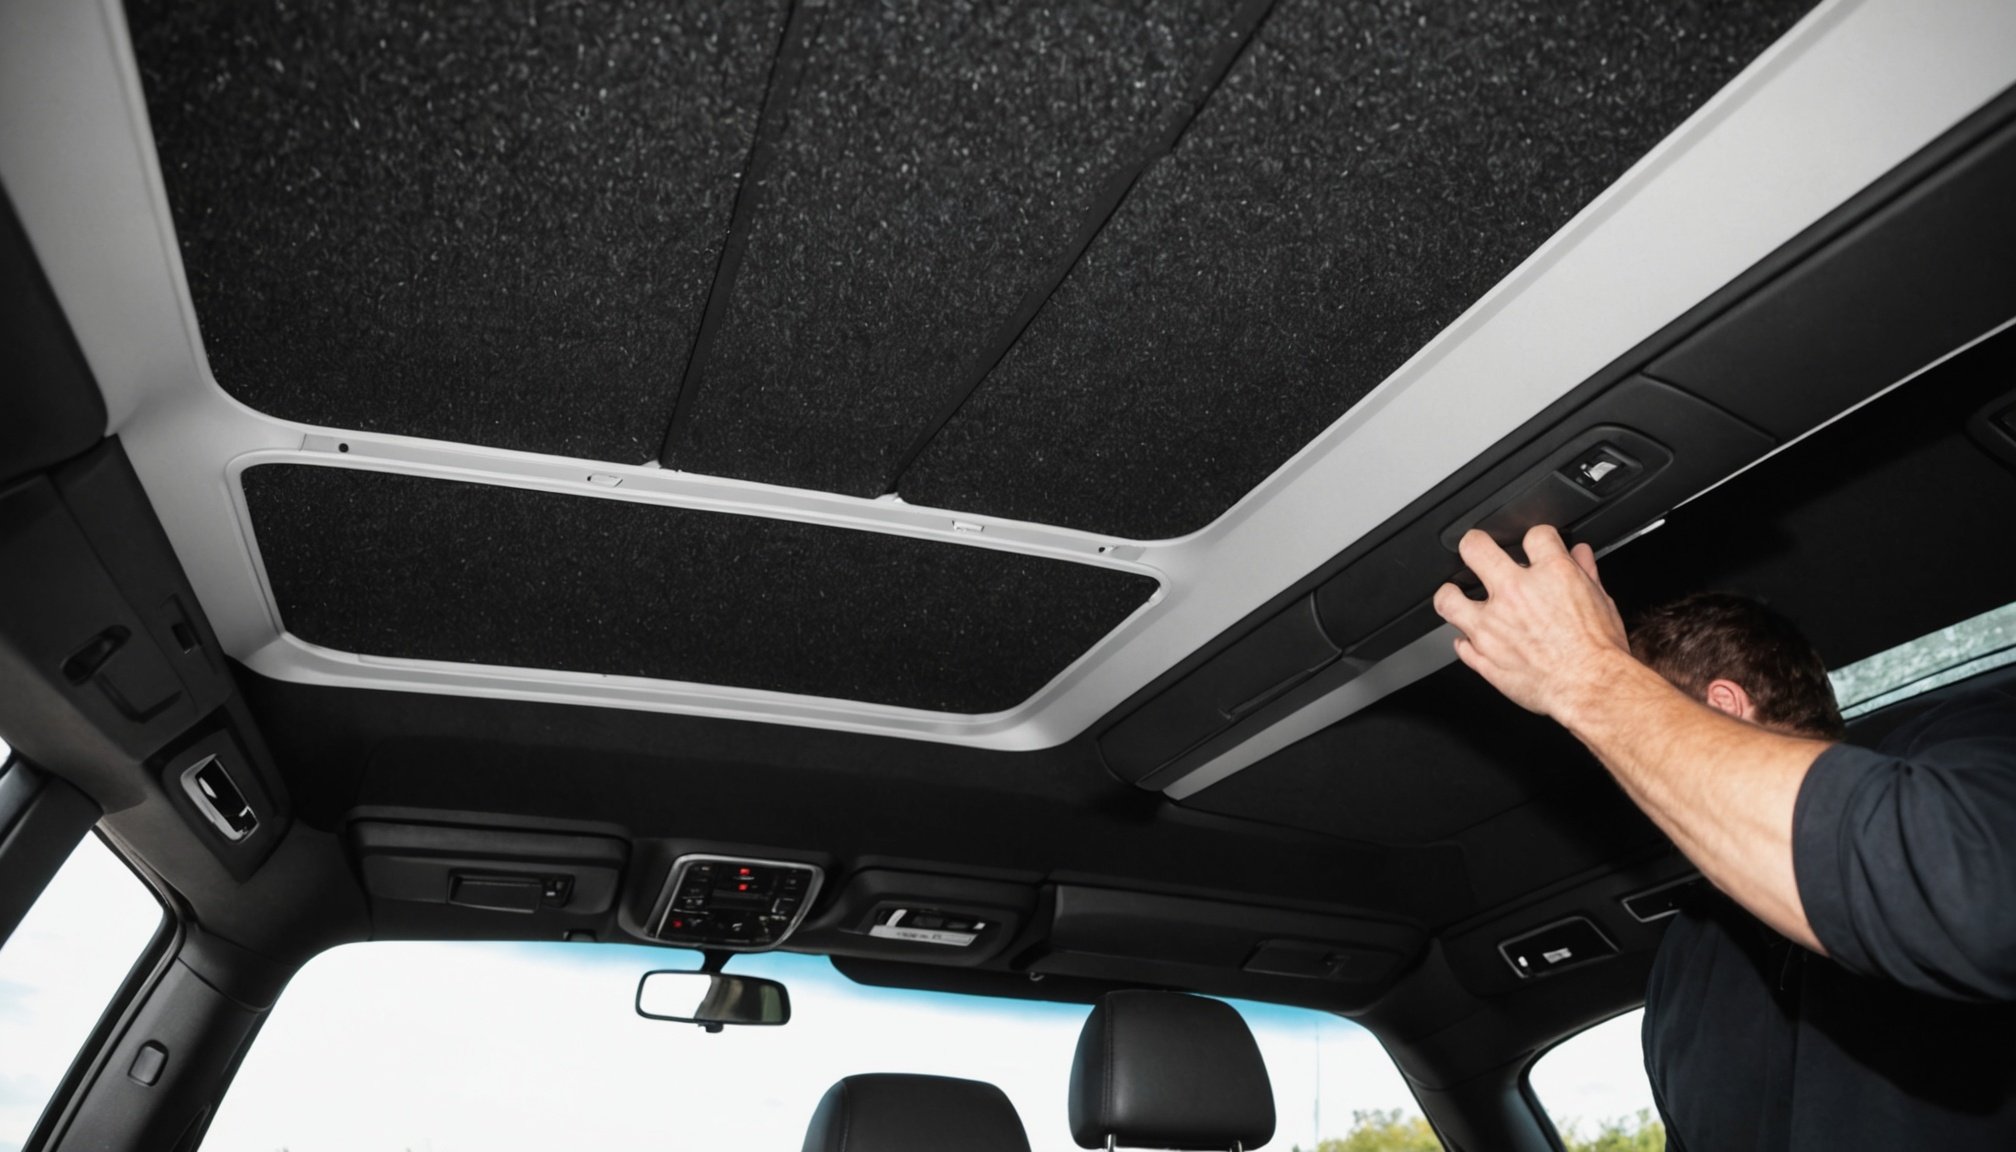
What is a Headliner?
The headliner is the fabric or material that lines the interior roof of your vehicle. It not only adds to the aesthetic appeal of your car but also provides insulation and helps in reducing noise levels.
Why Replace Your Headliner?
Over time, the headliner can become saggy, torn, or faded due to wear and tear, exposure to sunlight, or aging. Replacing it can significantly enhance the interior of your car, making it look newer and more comfortable.
In the same genre : Affordable taxi mol services: your safe and timely ride
Preparing for the Replacement
Tools and Materials Needed
To replace your headliner, you’ll need several tools and materials. Here’s a detailed list:
- Headliner fabric: Choose a high-quality fabric that matches your car’s interior. Options include suede, flat knit, or other materials specifically designed for automotive upholstery[2][4].
- Foam backing: Many headliner fabrics come with foam backing, which helps in maintaining the shape and providing insulation[2][4].
- Adhesive: A strong adhesive is necessary for securing the new headliner in place.
- Knife or blade: For removing the old headliner.
- Scissors: For cutting the new fabric to the right size.
- Trim removal tools: To remove trim and other accessories without damaging them.
- Cleaning materials: To clean the area before applying the new headliner.
Preparing Your Car
Before starting the replacement, make sure your car is ready:
- Disconnect the battery: To avoid any electrical issues, disconnect the negative battery terminal.
- Remove accessories: Take out any accessories that might get in the way, such as the rear view mirror or trim pieces.
- Remove seats if necessary: In some cases, you may need to remove the right passenger seat to access the entire roof lining[3].
Evaluating and Removing the Old Headliner
Inspecting the Damage
Examine the current state of your headliner to determine the extent of the damage. If it’s just sagging in a few areas, you might be able to repair it with some glue. However, if it’s torn, faded, or heavily damaged, a full replacement is necessary.
Removing the Old Headliner
Use a knife or blade to carefully remove the old headliner. Be cautious not to damage any underlying components. Here are some steps to follow:
- Identify the attachment points: Look for where the old headliner is attached to the roof.
- Apply heat: Sometimes, applying heat can help loosen the adhesive.
- Gently peel off: Start peeling off the old headliner, working your way around the roof.
Replacing and Reinstalling the New Headliner
Cutting the New Fabric
Cut the new headliner fabric to the right size, ensuring it fits perfectly over your car’s roof. Here are some tips:
- Measure carefully: Measure the roof area multiple times to ensure accuracy.
- Cut slightly larger: Cut the fabric slightly larger than the measured size to allow for adjustments.
Applying Adhesive and Installing
Apply the adhesive to the roof and the back of the new headliner fabric. Here’s how to proceed:
- Apply even pressure: Use a roller or a similar tool to apply even pressure, ensuring the fabric adheres well to the roof.
- Smooth out wrinkles: Use a brush or a similar tool to smooth out any wrinkles or air bubbles.
- Allow to dry: Let the adhesive dry completely before reinstalling any accessories.
Reinstalling Accessories
Once the new headliner is in place, you can reinstall any accessories you removed:
- Replace trim pieces: Put back any trim pieces, mirror housings, or other components.
- Reconnect the battery: Reconnect the negative battery terminal.
Professional Help: When to Seek It
While DIY replacement is feasible, there are times when seeking professional help is advisable.
Benefits of Professional Help
Here are some benefits of hiring a professional:
- Expertise: Professionals have the experience and skills to handle complex repairs.
- Convenience: They bring their tools and materials, saving you time and effort[3].
- Quality: Professionals ensure a high-quality finish that lasts longer.
Finding the Right Service Provider
If you decide to hire a professional, here’s how you can find the right service provider:
- Use platforms like Airtasker: Platforms like Airtasker allow you to post your job and receive offers from local professionals[3].
- Check reviews: Look for reviews and ratings to ensure you’re hiring a reliable service provider.
Practical Insights and Actionable Advice
Saving Time and Money
Here are some tips to save time and money during the replacement process:
- Choose the right materials: Select high-quality materials that are designed for automotive upholstery to ensure longevity[2][4].
- Plan ahead: Make sure you have all the necessary tools and materials before starting the project.
- Avoid heavy-duty repairs: If the damage is extensive, it might be more cost-effective to hire a professional.
Maintaining Your New Headliner
To keep your new headliner in good condition, follow these maintenance tips:
- Regular cleaning: Use a soft brush and mild detergent to clean the headliner. Avoid using harsh chemicals or abrasive materials.
- Avoid direct sunlight: If possible, park your car in shaded areas to reduce exposure to direct sunlight.
- Handle with care: Avoid touching the headliner excessively, as oils from your skin can cause it to deteriorate over time.
Table: Comparing DIY and Professional Headliner Replacement
| Aspect | DIY Replacement | Professional Replacement |
|---|---|---|
| Cost | Generally cheaper | Can be more expensive |
| Time | Requires your time | Saves your time |
| Skill Level | Requires DIY skills | No skills required |
| Quality | Depends on your skills | High-quality finish guaranteed |
| Tools and Materials | You need to purchase | Provided by the professional |
| Convenience | You need to do everything yourself | Convenient, as professionals handle everything |
Quotes from Experts
- “Replacing the headliner is a great way to refresh the interior of your car. It’s a project that can be done DIY, but if you’re not comfortable with the process, hiring a professional can ensure a flawless finish,” says a car upholstery specialist.
- “The key to a successful headliner replacement is using the right materials and taking your time. It’s not a rush job; patience and attention to detail are crucial,” advises another expert.
Replacing the headliner in your car is a rewarding project that can significantly enhance the interior of your vehicle. Whether you choose to do it yourself or hire a professional, understanding the process and using the right materials is essential. By following this guide, you’ll be well on your way to mastering the art of headliner replacement, saving time, and ensuring your car looks its best.
Final Tips
- Take your time: Don’t rush the process. Each step requires careful attention to detail.
- Use the right tools: Invest in a good tool kit to make the process smoother.
- Care for your new headliner: Regular cleaning and proper care will extend the life of your new headliner.
By mastering the art of headliner replacement, you’ll not only save time and money but also ensure your car’s interior remains in top condition, providing you with a comfortable and stylish driving experience.
Understanding Car Headliners and Their Importance
The car headliner is more than just a ceiling; it plays a crucial role in the vehicle’s aesthetics and comfort. Typically made from layers of materials like fabric or foam, the headliner serves to cover a car’s interior roof. Its main function is to provide sound insulation, hide wiring, and contribute to the car’s appearance, creating a polished finish.
Significance of Headliners
A well-maintained headliner enhances vehicle aesthetics by providing a clean and cohesive look. It also improves comfort by absorbing sounds, reducing external noise, and insulating the cabin, maintaining temperature control. Without an intact headliner, a car might seem worn out or neglected, impacting its overall appearance.
Common Reasons for Headliner Replacement
Over time, headliners may sag or detach due to factors like exposure to heat, humidity, or adhesive deterioration. Stains or wear and tear can also necessitate replacement. In some cases, accidental damage may also prompt headliner replacement to restore the vehicle’s aesthetic value and maintain comfort. Maintaining a clean and intact headliner is essential not only for aesthetics but also for ensuring a peaceful and pleasant driving environment.
Tools and Materials Needed for Headliner Replacement
To ensure a successful headliner replacement, it’s crucial to have the right tools and materials. Whether you’re a DIY enthusiast or seeking to save on professional costs, knowing what you need is half the battle.
Essential Tools for Headliner Removal and Installation
For any headliner replacement project, specific tools are indispensable. A set of DIY tools for upholstery is highly recommended. These typically include a trim removal tool, screwdrivers, and a utility knife. A strong pair of scissors may also be required, especially when trimming fabric edges. Keeping a clean cloth handy will help in maintaining tidiness throughout the process.
Types of Adhesives and Materials Suitable for UK Car Models
When dealing with UK car models, choosing the right adhesives is crucial. It’s best to opt for a high-strength spray adhesive, specifically designed for automotive upholstery. This ensures the longevity of your workmanship. Additionally, selecting suitable materials for headliner replacement, such as foam-backed fabrics, can enhance the result.
Recommendations for Sourcing Materials Locally in the UK
For those looking to source headliner replacement tools and materials locally, UK automotive supply stores are excellent places to start. Many offer specialized products suited for regional vehicle models, ensuring you get materials with the right specifications.
Step-by-Step Process for Headliner Replacement
Replacing a car headliner can significantly refresh your vehicle’s interior. Follow this comprehensive headliner replacement guide for a successful installation.
Preparing the Vehicle
Start by selecting a safe, flat workspace with ample lighting. Remove accessories such as seats or panels for better access to the headliner. Detach overhead consoles, sun visors, and interior lights. This preparation is crucial for a smooth car headliner installation.
Removing the Old Headliner
Carefully peel away the old headliner, starting at one edge. Use a gentle tugging motion, and be cautious of staples or fasteners. Take note of any wiring or connectors you encounter, as these will need reconnecting later. This step ensures the structural integrity of the area for the impending headliner replacement guide.
Installing the New Headliner
Position the new headliner carefully, making sure it aligns correctly. Temporary tacking pins might help hold it in place while you make adjustments. Begin gluing, stapling, or securing your headliner, smoothing wrinkles as you go. Align all holes for mounting equipment before final fixation. Finally, reinstall any removed accessories, ensuring everything is as it was, but better.
Common Issues During Headliner Replacement
Replacing a vehicle’s headliner can be a meticulous task, fraught with potential headliner replacement problems. One recurring issue is inaccurate measurements, leading to an ill-fitting result. This problem is often rooted in hastiness, so it is crucial to double-check dimensions before cutting any material. Long-term success in avoiding common mistakes such as this begins with careful planning and attention to detail.
Ensuring the adhesive is properly applied is another frequent hurdle. Improper application can result in sagging and peeling, necessitating a complete redo. Always use a high-quality adhesive, specific to automotive interiors, and apply it evenly across all surfaces for optimal results.
During installation, a significant challenge is maintaining the correct alignment. An off-kilter fitting can disrupt both the aesthetic and practical aspects of the headliner. Continuous troubleshooting headliner issues as they arise during installation helps prevent small errors from escalating.
Finally, wrinkling often poses a problem when the fabric is stretched inconsistently. To tackle this, using a smoothing tool and applying consistent tension while attaching the fabric can achieve a seamless finish. These strategies emphasise the importance of patience and precision in preventing further complications.
DIY Tips and Best Practices
For those tackling a DIY headliner project, understanding the best practices is crucial. Start with precise measurements to avoid material waste. Using a specialised adhesive spray can prevent sagging, a common issue DIYers face. For additional reliability, ensure the area is clean before applying the new headliner. A clean surface allows for better adhesive performance, reducing the likelihood of future issues.
Headliner replacement best practices suggest tackling the task in sections. This approach offers more control, allowing for adjustments if necessary. When working on corners, a heat gun can help mould the fabric nicely, giving it a professional look. Incorporating these techniques not only ensures a quality finish but also enhances the longevity of the headliner.
Experienced UK car enthusiasts often recommend using a high-density foam backing, offering both aesthetic and soundproofing benefits. Maintaining consistency in pressure while applying the headliner is key. This technique prevents air bubbles and maintains the fabric’s adherence.
For comprehensive car upholstery advice, always keep the workspace organised and ventilated. Regular tool maintenance can prevent mishaps that might damage the fabric. Follow these guidelines to achieve a seamless and lasting headliner replacement.
Local Services and Resources in the UK
Discovering the right car upholstery services in the UK could transform your vehicle’s interior drastically. If you’re in search of reliable professionals for headliner replacement, consider businesses recognized for exemplary service and customer satisfaction.
Finding Reputable Upholstery Services
In the UK, local car maintenance experts are often distinguished by user reviews that reflect the quality and reliability of services rendered. Websites like Trustpilot and Yell can be invaluable for providing honest customer feedback on a wide range of headliner replacement professionals across the country. Aim to choose upholstery services with consistently high ratings and positive testimonials.
DIY Resources in the UK
For those keen on a do-it-yourself approach, there are numerous resources available to procure UK-specific materials and supplies. Not only can this be more economical, but it provides full creative control over the outcome. Look for local suppliers who offer quality fabrics and adhesives tailored for vehicle interior projects. Engaging with online DIY communities can also offer guidance, helping you make informed decisions and avoid common pitfalls.
Ultimately, whether opting for professional services or DIY, the UK’s diverse automotive service landscape offers plentiful solutions to cater to varying needs and preferences.